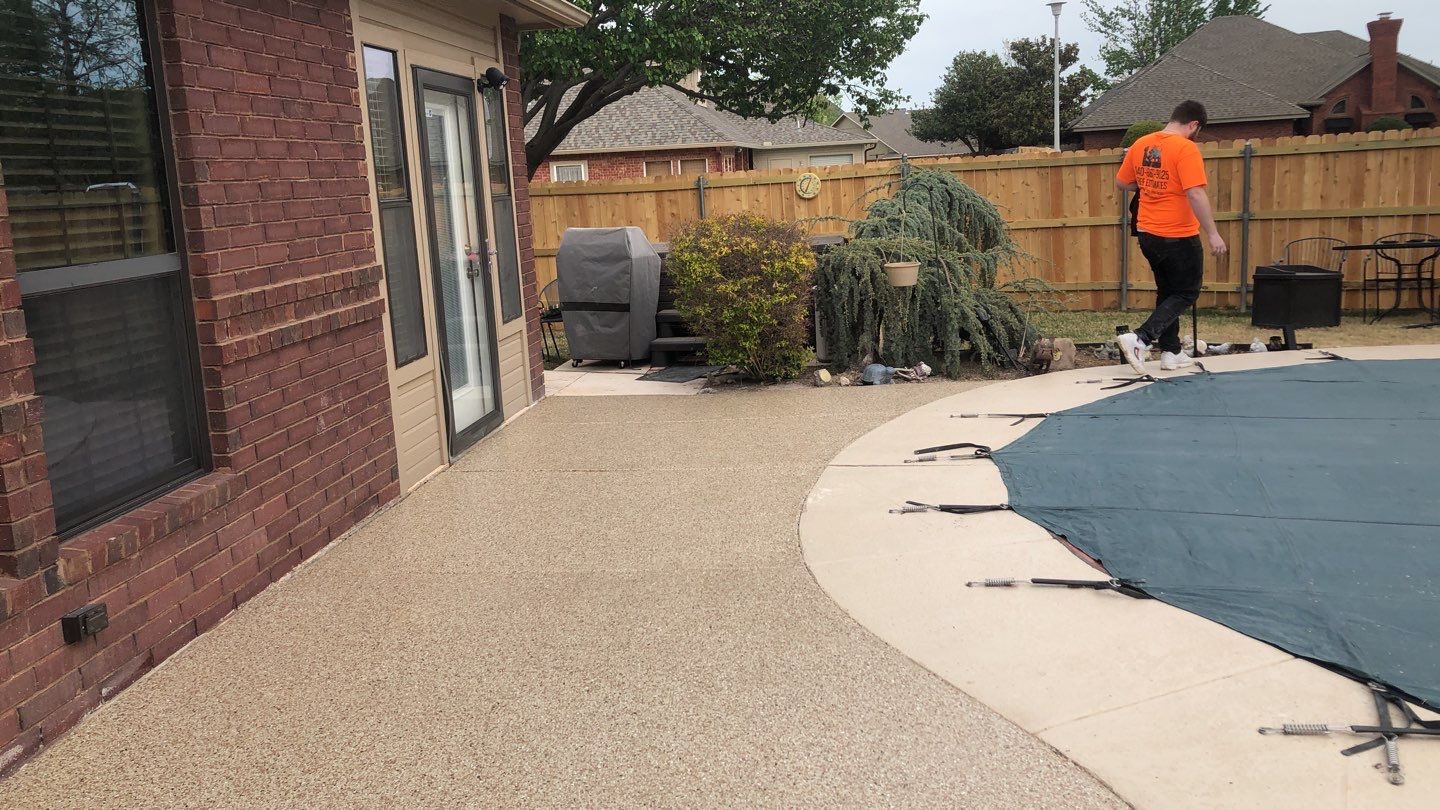
Our team resurfaced an existing concrete pool deck with our cutting edge Polyurea Floor Coating system. Able to be utilized in both Indoor & Outdoor environments, our products will hold up to heavy foot traffic and environmental conditions such as a swimming pool deck.
Our team takes great care to ensure the safety, accuracy and professionalism of our installations. For this particular job site we were diligent to prep the job site and protect the swimming pool prior to installing our products. Additionally, we take great steps to clean up our work environment after install so our client can begin enjoying their new pool deck within 24-hours of installation!
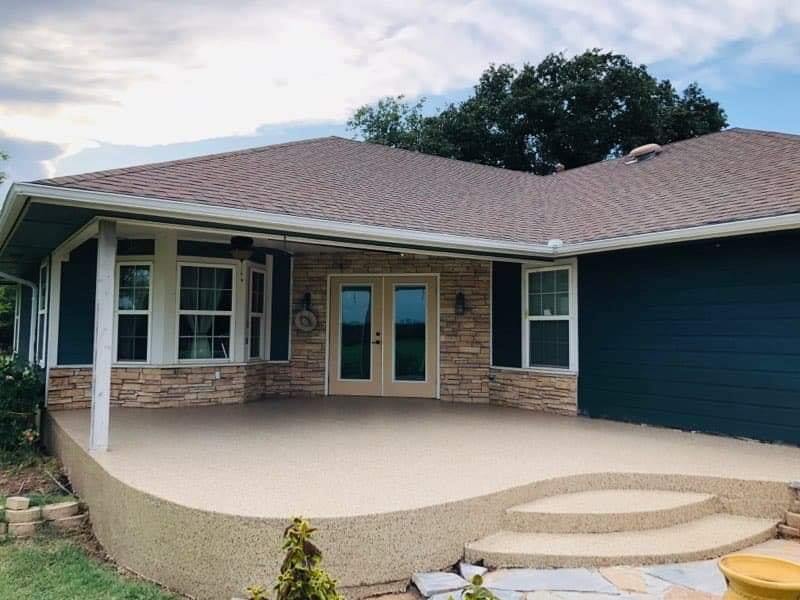
Here you can see some beautiful images of the transformation that took place in this backyard. The color selection by this client plus their existing outdoor design truly transforms this space into a comfortable, durable and relaxing outdoor living space!
Our team replaced an existing (and failed) epoxy concrete coating on a free form swimming pool deck. As you can see from these images, the epoxy surface completely failed to the elements and delaminated from the concrete surface.
By grinding down the concrete surface to remove the epoxy, we were able to attain a fresh concrete substrate to apply our Polyurea Basecoat and Chip Flake system. Now our client has a beautiful polyurea 1 Day Coatings surface that is sure to last for years to come!
We love big projects! It’s the time for us to show off our work and showcase what we can do as a company! For many of our clients, this is their first time investigating our product line and often times they have a lot of questions. What types of surfaces can your product be installed on? How easy is it to install? How long does it last? How protective is this floor coating? How much does it cost?
At first glance, we understand their questions. Our polyurea floor system is a unique product that very little companies offer. For most of our clients, they have never heard of polyurea floor products and they don’t know all of the benefits that they offer. From its wide protective characteristics to its longevity and wide color variations – our floor coatings can do practically anything we ask them to do. From commercial kitchens, to warehouse & factory settings to school cafeterias or even back patio installations – our polyurea floor system is designed to handle high stress environments down to simple daily living.
So to answer our clients questions simply: our polyurea floor system is designed to protect concrete surfaces with a 15-year residential / 5-year commercial warranty. Yes, we do stand behind our warranties and we offer a wide array of standard or customizable colors to choose from. Additionally, for most residential applications, our products can be installed in as little as one day. This is truly a revolutionary product line with a wide array of applications. Our clients love what we offer them and we’re happy to answer any questions that you may have while browsing our website!
What Are The Steps in our Application Process?
To truly understand our products, it helps a little to understand how they are installed. Our crews did an amazing job capturing the installation of this job site from start to finish to showcase all of the detailed steps of our process.
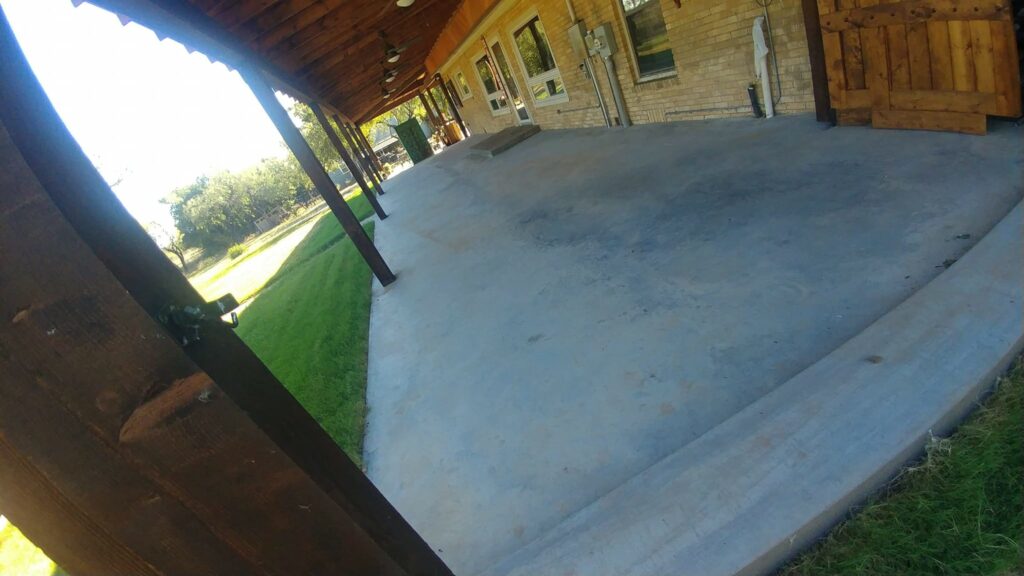
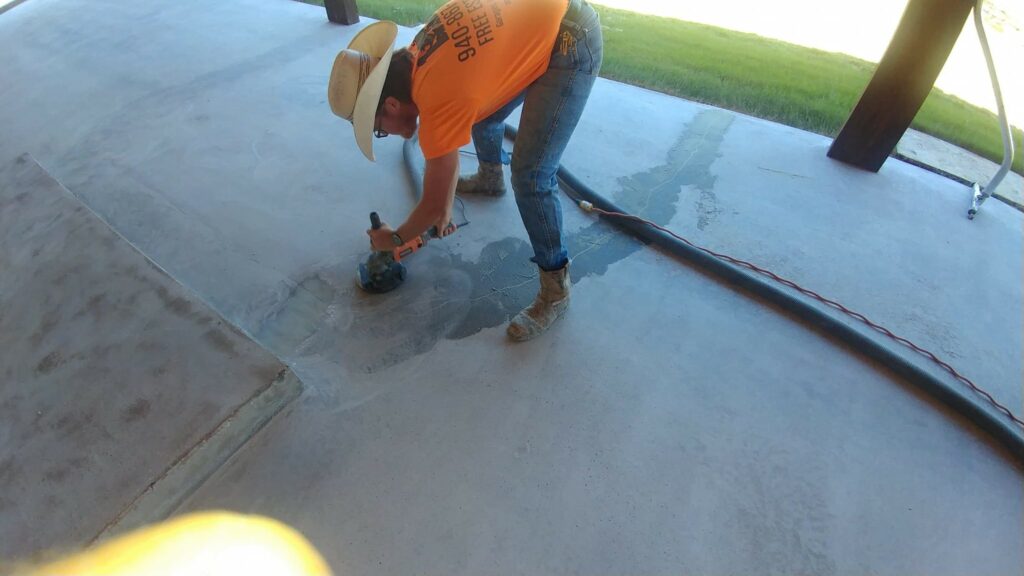
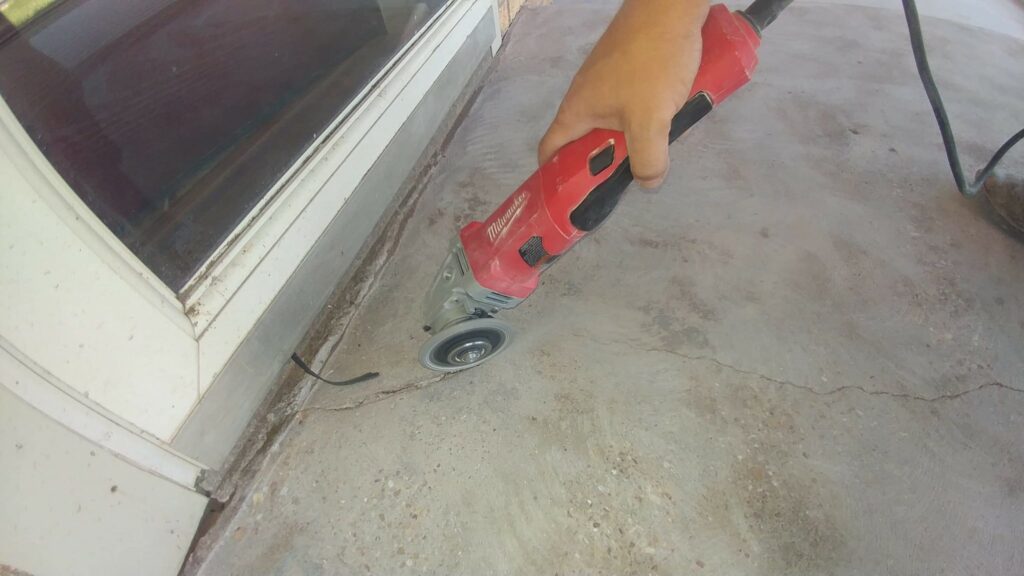
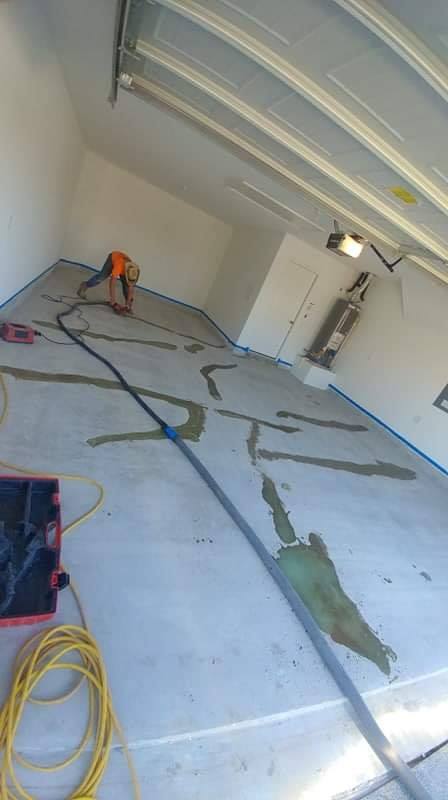
As you can see from our images, our crews initially start with a “blank slate.” Our products can only be installed on concrete surfaces but first we have to prepare our concrete surfaces for the installation. The image below showcases our technician grinding our concrete surface to make deep cuts along the hairline cracks of the substrate. Our purpose for grinding deeper into the cracks is to repair the concrete surface with our CR Mender product.
Upon installation of our CR Mender, we can begin grinding our concrete surface within 10 minutes of application. Additionally, our CR Mender is self-leveling and provides extreme adhesion for our Polyurea Basecoat. This should be considered as Step #1 of our application process and from here we complete Step #2: Grinding our Concrete Surface.
After we treat and repair all hairline cracks within our substrate, we move onto Step #2: Grinding our Concrete Surface. Our products work much like a strong glue to concrete. However, concrete becomes dusty, oil ridden and acts as a poor adhesive surface from years of exposure to the elements. In order for us to prepare our surface for adhesion to our Polyurea Basecoat, we mechanically grind our surface to remove the to layer of concrete.
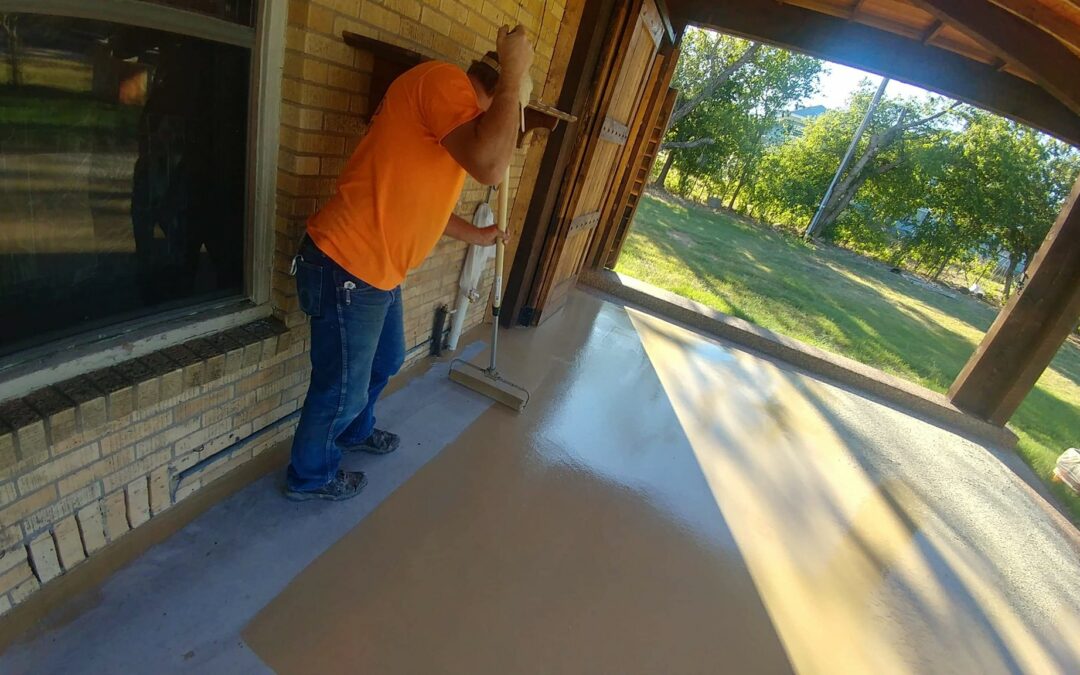
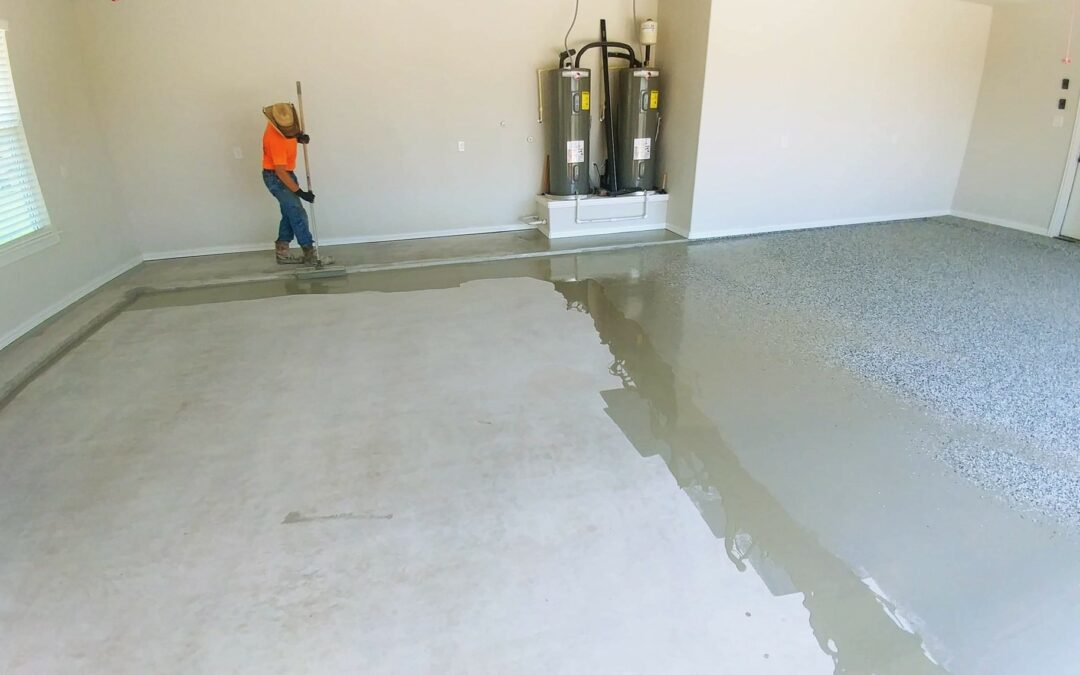
After we’ve removed the top layer we can then roll on Step #3: our Polyurea Basecoat. This product is rolled directly onto our concrete substrate and acts as the “glue” between our substrate & vinyl chip flakes. Once applied, this product cures in just a few short hour so we have limited time to apply our Vinyl Chip Flakes before the workability of the product diminishes.
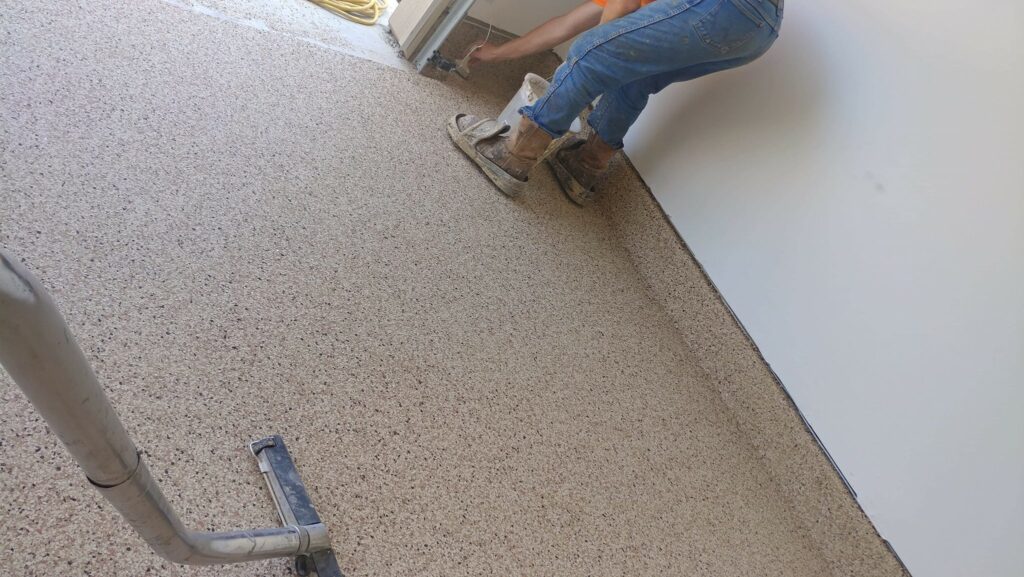
Now is the fun part: Step #4 – Vinyl Chip Flakes. At this stage, we apply the colorful vinyl chips that are distinct to the look and appeal of our product line. Because we are working with “vinyl” chip flakes – we have nearly a limitless amount of colors for you to choose from. Of course, we have some pre-assorted colors that you can browse our on Color Options page of our website. However, if you have a specific color arrangement in mind – we can help!
Just email us a picture of a logo or image so we can identify the Vinyl Chip Flakes that match closely to your design. From here we can create a customized surface that matches your business, favorite sports team or just to express your artistic creativity!
Upon installation of our Vinyl Chip Flakes we then move onto our final step: Polyurea Top Coat. This is the final stage of our installation process and it’s what seals and protects our Vinyl Chip Flakes from the outside elements. Rolled on as a clear liquid, our Polyurea Top Coat cures to create an “orange peel like” texture that provides excellent adhesion and superb protection for years to come!
Get a Free Estimate Today!
Do you have a specific room at your home or office that you’ve been dreaming of redoing? Is it perhaps a garage, office, warehouse, showroom or kitchen? The possibilities for our product line are endless – as long as it’s installed on a concrete surface.
If you’d like to receive some free information for our products, we invite you to fill out our Contact Form! You can even upload some basic dimensions for your job site along with some photos. This helps our estimates generate a basic estimate and helps you to get the most information upfront and quickly!
Do you have that favorite project team at work who is always willing to show up and put in a hard day’s work?Are they are dedicated, talented and focused on doing a great job on any task that you give them?Whether it involves a time consuming task or a project that is more complicated than what they are used to – do they see it as a positive challenge? Maybe you’ve even noticed an improvement in client feedback because your clients enjoy working with that team so much?
At 1 Day Coatings, we have a team just like that! Brandon and Coe are new installers for 1 Day Coatings who seem to have their own following. They are young, dedicated and always willing to put in the extra hours to provide that exceptional experience for our clients. From large outdoor remodels to interior garage floor repairs & coatings – they seem capable of doing it all and with smiles on their faces.
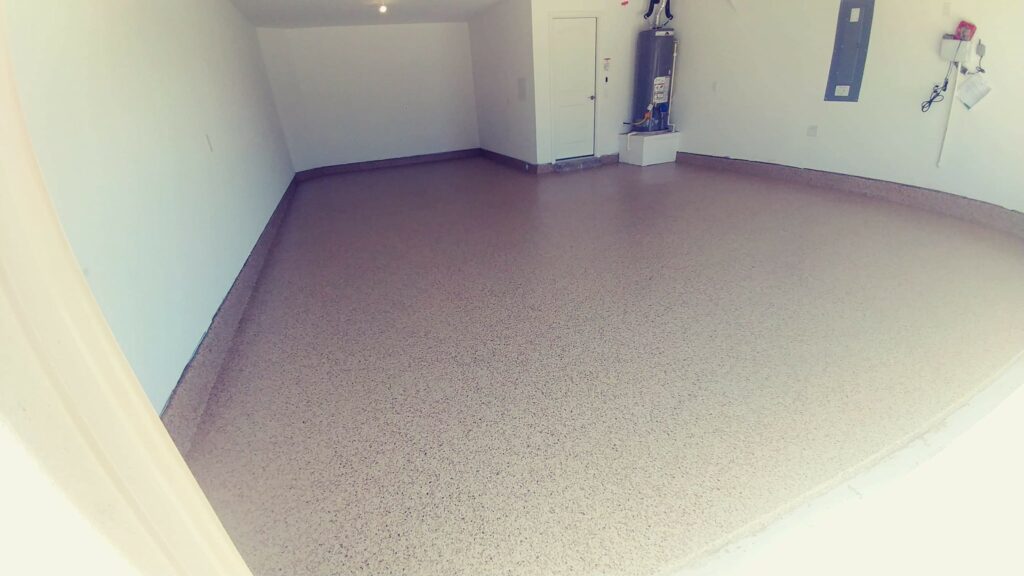
Our clients love their ability to work quickly, install our 1 Day Coatings products and deliver exceptional value for their homes and offices. We are certainly proud of having Brandon and Coe on our team and we love the results that they deliver for our clients. This project is no exception and you can see just how beautiful this garage floor looks with this stunning Pecan Colorinstalled in just one day!
Texas – The Perfect Environment for Crack Formation
Like most garage floors, this particular job site didn’t have any type of protective coating on the floor surface. Just exposed concrete. This is builder grade material and if you go out to purchase a home today, you’re 99% likely to wind up with this type of surface in your garage. Additionally, if you’ve owned a home previously, you familiar with floor stains and how easy they are to acquire. Whether it’s an oil leak from your car, a spilled can of paint, some dirty tools or just wear and tear over time – exposed concrete floors don’t hold up well over time.
In addition, you’ve always got to add in the factor of slight ground movement. Texas is the best state in America (nobody is arguing that) but we have some HOT summers and COLD winters. All of this variation in our ambient air temperature causes the soils beneath our homes to expand and contract.
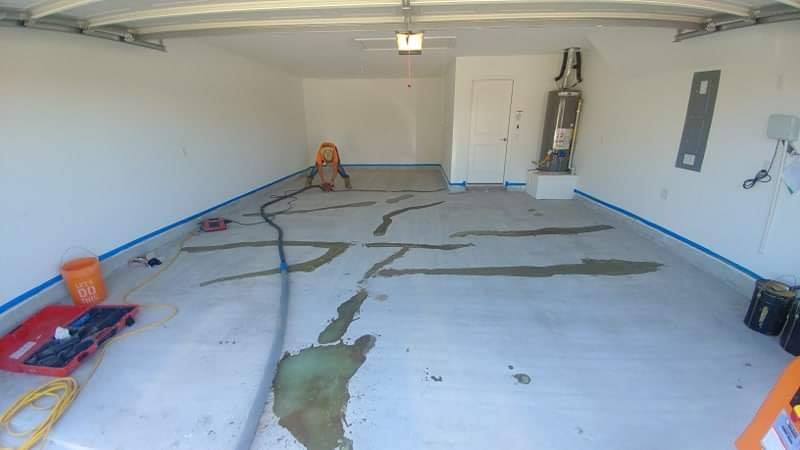
These changes in air temperature drive expansion and contraction beneath the slabs of our home. Compound this with periods of dryness or wetness (due to heavy Spring rains) and you’ve got an environment that is perfect for concrete crack formations. This garage was no exception and our client had lots of hairline cracks spreading the surface of their garage floor. Luckily, we’ve got the perfect treatment option for floors with cracks so we performed some crack repair and treatment prior to moving forward with our installation.
Crack Repair & Surface Treatment
In order for us to patch and smooth our this concrete surface, we applied our CR Mender – developed by Penntek Coatings. This product works exceptionally well for filling in a wide array of crack sizes to create a smooth surface finish. It works by filling the voids left from cracks to create a surface that is two-times stronger than standard concrete. Once applied, we putty knife the finish to create a smooth layer with unnoticeable deviation from our concrete surface to the CR Mender product.
Our 1 Day Coatings applicators want our product to last for years to come: 15-years (Residential) & 5-years (Commercials) to be exact. That’s the timeframe for our exceptional warranty and we stand behind our products throughout the lifetime of your warranty policy with us! In order for our applications to hold up for these durations of time, we thoroughly inspect your concrete surfaces for imperfections to perform all types of repairs prior to applying our 1 Day Coatings products!
This is our way of insuring our client satisfaction and the optimal performance of our Polyurea floor coatings. By thoroughly evaluating the concrete surface, we identify and patch all of the existing cracks – providing our crews with a stronger and more durable surface than what was previously there.
Applying The Pecan Color
At 1 Day Coatings, we have a strong lineup of pre-assorted color selections that you can view on our Chip Color page! We have lots of clients who love the color selections that we already have picked up. Of course, you always have the option of customizing your color blend. After all, we are working with Vinyl Chip Flakes and there are literally hundreds of vinyl chip flake colors to choose from. But for this installation, our client was happy to go with the Pecan color chip, as seen on our images.
In order to prepare our concrete surfaces for the application of our Vinyl Chip Flakes, we first follow these steps:
Mechanically Grind the concrete surface to expose a fresh layer of concrete
Vacuum and remove all dust and debris
Identify & Treat all Surface Cracks with CR Mender or CR Patch & Coat
Apply Polyurea Base Coat across entire concrete surface
These steps sound simple, and they certainly are. However, the trick comes to the level of detail that we perform for each installation.
As you might image, our Polyurea Floor Coatings “adhere” to your concrete surface. In order for us to create the optimal level of adhesion, we have to first properly “prep” our concrete surface and remove all forms of dust, debris and repair the surface. Once “prepped” our teams apply our Polyurea Basecoat to create our first layer of adhesion to the concrete surface. From here, we broadcast our Chip Flake Selections across the fresh Polyurea Basecoat to create our color blend.
Get a Free Estimate Today
Do you have a specific area of your home or office that you’d like to protect and improve the performance of? If so, we invite for you to give us a call or fill out our Contact Form! Our teams are on standby ready to provide you with beneficial information pertaining to our Polyurea products and why they are the best products available for concrete coatings.
Have you ever invested your hard earned money into upgrading your home or office, only to realize you made a bad investment? Whether it be a new home appliance, used car, new computer or paint for your walls – sometimes our purchases wind up causing more harm than good. When our purchases don’t work as intended – it’s easy to feel frustrated and ready for the problem to be fixed.
As a part of the floor coating industry, we’ve seen numerous clients with this predicament. From garage floor epoxy coatings, to stamped & stained concrete decks – the scenarios are always different and yet similar in their problem. In each of these scenarios, our client is frustrated by their unhappiness with their current floors and want something new and restorative.
It’s in these scenarios that we are glad to introduce our Polyurea Floor Coatings. Not only is our product a fix-all solution, but it’s also colorful and safe for your indoor surfaces and outdoor living spaces. Versatile by design, it can be installed in dirty, hard working areas such as a commercial garage or in a delicate, beautiful space like a business showroom. In all of these cases, our product is easy to keep clean and stands tough to wear and tear due to it’s durable Polyurea composition.
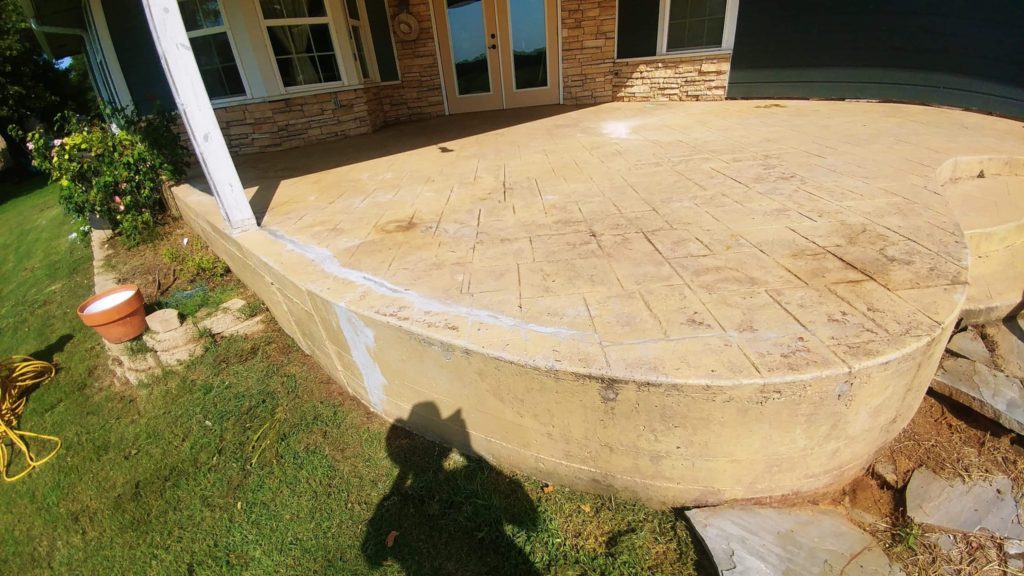
Here you can see how this stamped & stained concrete deck looked prior to our installation technician arriving at the job site. This surface appears severely worn as you can see a wide array of discoloration and some concrete patching. The truth to stamped & stained concrete is: it’s tough to maintain and doesn’t wear as well as you hope when purchasing the material.
A Stamped & Stained Concrete Deck
Stamped and Stained concrete decks are a popular surface selection that many home owners choose for their outdoor living spaces. When installed properly, it’s both beautiful and durable. Unfortunately (as we mentioned above) there are always conditions where a home investment turns sour. Additionally, it’s not until the installation of the Stamped & Stained material is complete that you can see the finished product.
Whether it be an incorrect installation, poor color selection or improper cure sequence – your concrete surface can be ruined by a Stamped & Stain gone wrong. So what is there to do in a situation like this?
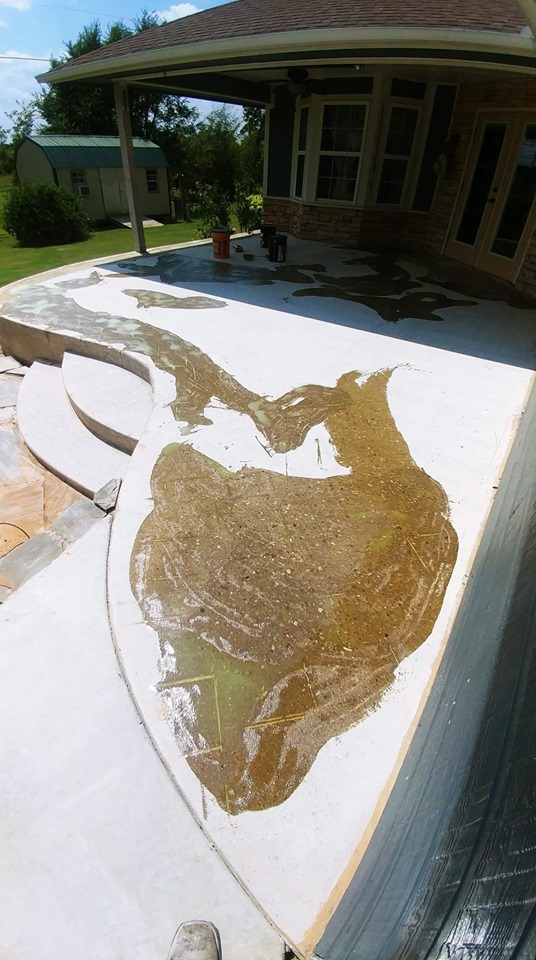
Unfortunately, with stamped & stained concrete surfaces, there is very little that can be done besides covering it up. Because stamped & stained concrete is still concrete, the top surface cannot be easily removed. Additionally, the stain absorbs into the concrete. If you were to remove the first few inches of concrete materials, you’d likely still see the stain in the lower layers of concrete. That means that grinding the top surface down isn’t likely the best course of action.
Our installation technician used our CR Mender to fill the cracks & voids between the stamped concrete surface. Originally, this concrete material was meant to look like a French pattern surface (with various stones sizes). Luckily, our CR Mender was able to fill the voids to create a smooth surface for our Polyurea materials to be applied.
Cover It With Our Polyurea Concrete Coating
Luckily, 1 Day Coatings offers the perfect concrete coating material. Our Polyurea Concrete Coatings are designed specifically for concrete. That also means that it’s also the perfect solution for covering up Stamped & Stained concrete surfaces.
As you can see from our images, our installer was able to use our CR Mender to fill the voids between the concrete stamp. By filling the voids, we created a smooth and flat surface to then apply the remainder of our products for the installation. From here we followed our same installation procedures to install our Polyurea Base Coat, Vinyl Chip Flakes & Polyurea Top Coat.
What we are trying to say is this: even if you feel like your concrete surface is ruined and beyond repair – there is still hope! To date, we’ve repaired dozens of concrete surfaces with a wide range of issues. From epoxy floor coatings, to Stamped & Stained surfaces, to cracked concrete or stained concrete – it’s all fixable by our revolutionary products developed by Penntek Coatings.
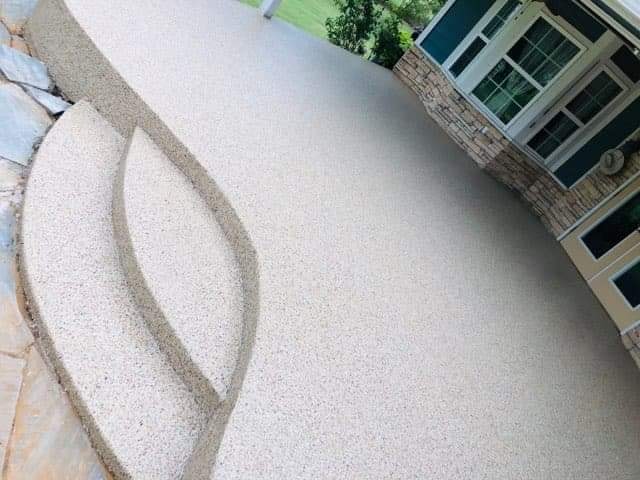
Alas, you can see how transformative and beautiful this concrete surface looks after the application of our Polyurea Concrete Coating. This application is particularly amazing because you can’t even see any sign of the stamped & stained concrete surface that lies beneath the surface. Our technician did an amazing job of hiding the stamped layer and left our client with a smooth surface with a consistent texture.
Get a Free Estimate Today
Do you have a concrete surface that you need repaired? Would you like a free estimate for that repair? Our teams are ready to take a look at your concrete surface and to provide you with a free estimate for our services!
Getting a free estimate is easy and all you have to do is fill out our Instant Estimator form. Upload some images, provide us with your contact information and basic measurements. It’s your chance to give us all the information up front so that we can get back to you quickly!
Additionally, if you would like to receive some more information via email, please reach out to us directly at[email protected]. We’ve love to answer any of your questions and to send you brochure or product information!